

Turning a Suspended Bowl
A
Pictorial Article by Bob Hamilton
A square bowl which has corners that turn down and extend further down than the bottom of the bowl so that the bowl will rest on its corners with the bottom “suspended” above the tabletop is what I call a suspended bowl. I don't know if that is the correct term for this form but it is what I call it. :) A friend had been having some trouble getting one to turn out so he asked me for some pointers. It had actually been a few years since I last turned one so I decided to refresh my memory and get some pictures to help in explaining.
I started out by selecting a piece of suitable stock. Not all wood species are suitable for this form, because the thin downturned legs will have short grain areas that will chip out badly on wood that is brittle or coarse grained. Some chip out on the edges is pretty much inevitable no matter what wood you use, but minor chips can be dealt with relatively easily. Large chips are more difficult to handle, especially if they occur at the end of one of the legs. Avoid bold, open grained woods like oak or ash in favor of species with a tighter grain, like hard maple, which is what I used for this one.
Note: Please ignore the Oneway bowl steady in the background of the pictures. It is in its "parked" position behind the headstock and is NOT in use for any part of this project.
I had an 8/4 board of hard maple that was about 8 3/4" wide so I cut a piece off the end and squared it up on the tablesaw. I found the center and bored a 3/8" hole for my screw chuck. I oriented the annular rings so that the face of the board that was toward the bark when the board was part of the tree would become the top of the bowl. I don't know how much it helps but it seems to me that if the annular rings in the end grain of the blank sort of follow the downward droop of the legs it will minimize the short grain in the legs.
Photo#1: Blank prepared for mounting. Photo#2: Face dressed and toolrest moved.
After dressing the face of the blank flat I swung the toolrest around and started working on what will be the outside face of the legs in order to establish the width of the feet. On the whole this maple cut quite well but I did have one nasty chip come out right at the bottom end of one foot. If I were to remove enough material from the corner to get back past the chipped out area the foot would be way too wide and there would be no guarantee that I wouldn't have another chip while cutting it back, so I will leave it for now and deal with it later.


Photo#3: Working the corners Photo#4: Just what I don't want
Once I had the corner rough shaped I used my side ground bowl gouge in shear scraping mode to fair the curve and then sanded the outside of the legs to 400 grit.
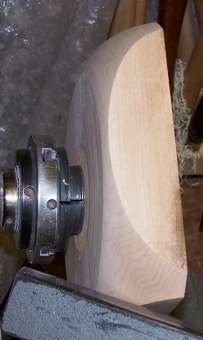

Photo #5: Shaping complete Photo #6: Corner sanded.